|
Neck Turning Basics
Turning Cartridge Brass Necks for High Power Shooters
Other Technical Articles >
This article is an introduction to neck turning for High Power shooting. The reasons we might choose to turn necks are different from those of other disciplines and our focus is solely on High Power shooting. I intend to cover two topics: why to turn necks and how to turn necks. There are, undoubtedly many other ways of doing this, I'm simply presenting my way, it works well for me and is simple enough to duplicate without too much expense. Remember that all of the pictures can be enlarged by clicking them, this will help with small details. If you can see the details without enlarging, you shouldn't be worried about neck turning, you could be shooting a service rifle!
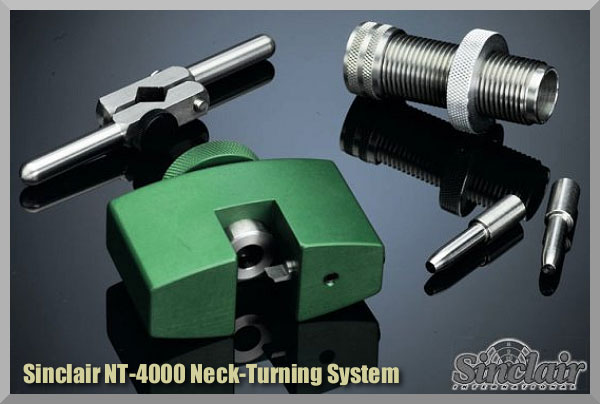
Neck Turning Basics
by German A. Salazar
Why Should You Consider Neck Turning?
Let's assume that your rifle doesn't have a tight neck chamber that requires neck turning; if you have a tight neck chamber, of course, the answer to the question is "because you have to". For the rest of us, and that includes the vast majority of Highpower shooters, neck turning isn't a requirement, but it can be a useful way to bring your ammunition a small but meaningful step closer to that pot of gold at the end of the rainbow: perfection. I'm not talking about a theoretical improvement, but a real one, an improvement that lies in equalizing and optimizing the neck tension of your loaded rounds. Inconsistent neck tension is a real contributor to increased muzzle velocity variance which itself is a significant factor in increased elevation dispersion at long range. So there's our basic reason for neck turning: to equalize and optimize neck tension in order to reduce elevation dispersion.
Before we get into the how-to section, let's do a bit of thinking and some basic math (not too much, I promise). We'll use my .30-06 chamber and a piece of Lake City brass as examples. The neck in my chamber measures 0.340" in diameter; I happen to know this because I have a print of the reamer used to cut it. If you don't have a print of your chamber reamer, measure the neck diameter of a piece of fired, unresized, brass that's reasonably new and add 0.001" to the dimension, that will be very close to the chamber neck diameter and certainly close enough for our purposes here.
Now let's measure the neck diameter of a loaded round with the brass we propose to use and neck turn. In this case, the loaded LC brass measures 0.335" although there is some variation depending on exactly where I measure; a little rotation changes the reading a bit. The reason is simple enough, the neck is not of uniform thickness all around. Basically, though, we have a 0.340" chamber neck and 0.335" ammunition neck, for a clearance of 0.005" (clearance will always be expressed as total diametrical clearance, not radial clearance). That's a reasonable amount of clearance (if only it were uniform) and ideally we would like to stay close to it, but whether or not we can depends to some extent on the brass quality and some convenience factors. We'll discuss these considerations further along; for now, at least we know where we are beginning the process, so let's get on with the how-to.
The Tools of the Trade
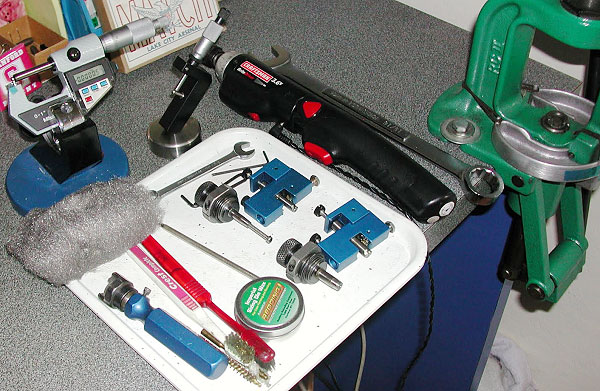
Here you see everything I use and a bit more. The press, a cordless screwdriver (always plugged in, turning is tough on the old battery), a couple of K&M neck turners (one set up for 6mm, the other for .30 caliber) an expander for each size, some Imperial lube, an old toothbrush or two to keep the cutter clean, a handle with a caseholder (for those emergencies when the screwdriver dies and there's just one more case to go!), steel wool and a tubing micrometer finish the list of tools. Hey, I left the dial calipers out of the picture! They're always handy, keep them around, but they are useless for measuring neck thickness, so don't try. I usually use an Optivisor magnifier while I turn necks, very handy for a clear view of what's happening on the neck.
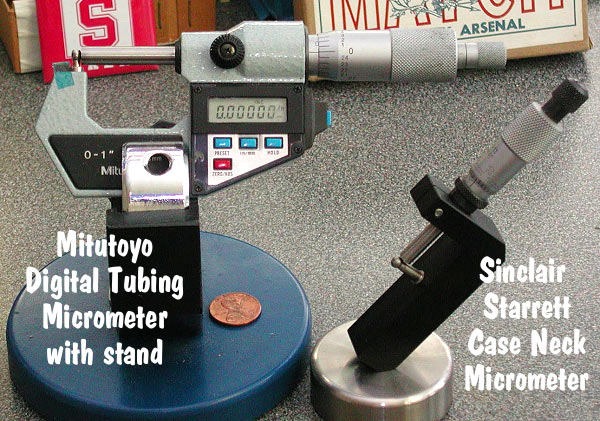
Here are a couple of tubing micrometers, an electronic Mitutoyo and a nice, old-fashioned, no battery required model from Sinclair. You might have noticed a method to my madness by now, anything that depends on electrons has a non-electron backup -- prudence.... If you aren't familiar with a tubing micrometer, enlarge the picture (we've already estalished we need to enlarge, right?) and notice that the fixed anvil is round, allowing the moveable flat anvil to make point contact and get an accurate thickness measurement at a specific point along the radius of the neck. You can't do this with a conventional micrometer and certainly not with calipers as they will cover an area rather than a point and will be affected by varying thickness over that area as well as by the radius itself.
While the purpose of this article isn't to teach the proper use of measuring tools, I should note that the while the Mitutoyo reads to five decimal places, that is in no way necessary for our purposes. I usually cover the fifth decimal place with a bit of tape to keep it from distracting me. In fact, that fifth decimal digit is completely unreliable unless you are in a temperature controlled environment and have really high measuring skills. In a home workshop, measuring brass which is pretty malleable, don't kid yourself, it's irrelevant and the 4th decimal place is only slightly less so. I only trust the 4th decimal place by rounding to a "5" or a "0" and for our purposes, that's enough.
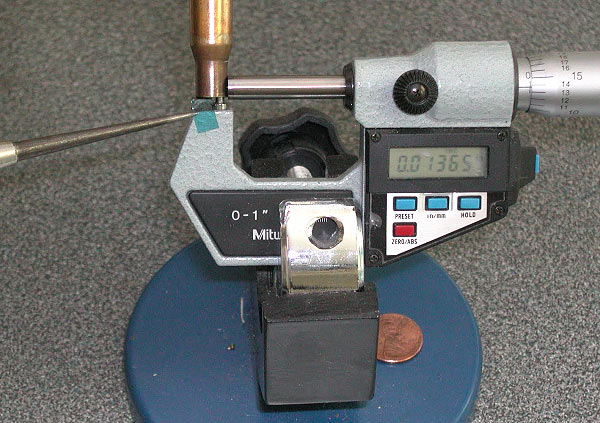
Using the tubing micrometer is no different from any other micrometer, it takes a bit of practice to develop a good feel though the ratcheting thimble is useful as you go. Note the little pad that I'm indicating with the pointer; it's there to provide a consistent resting point for the case mouth so that I always read at the same point. The pad is just a tiny scrap of thick leather held on with tape, not too high-tech. I haven't yet developed a simple way to do this on the Sinclair micrometer. As you can see, the case neck measures 0.0136" at the point we're checking; this case varied by over 0.001" around its circumference. I normally check brass at four points around the neck.
Initial Measurements and Decisions
Now comes an important moment, deciding how thin to turn the neck. One way to make that decision is to measure a decent sample of the lot of brass you're working with, say 10 to 15 cases, make note of what you generally see as the thinnest dimension, and turn to slightly less than that. This minimizes the amount of brass that you have to remove and keeps you from creating excessive chamber neck clearance. Excessive clearance can lead to premature neck splits in the brass, but in reality, if the brass is properly sized with bushing dies that isn't a problem unless you go crazy on the clearance. Conventional non-bushing dies work the brass much more, so whether or not it's turned, they will cause neck splits sooner than bushing dies.
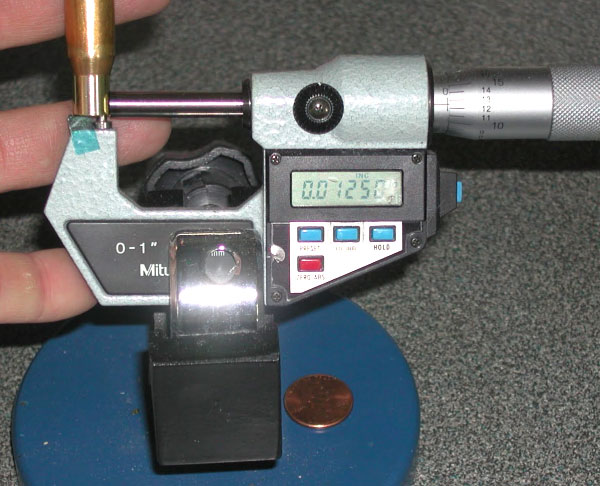
I take a slightly different approach to determining my desired neck thickness; because I use Lake City, Winchester, Remington, Lapua, Norma and Federal brass in my .30-06 loading, I've simply standardized on 0.0125" as my desired neck thickness so that I'm not constantly changing the bushings in my dies. This dimension is thin enough to clean up irregularities in even the thinnest of factory brass (Winchester) and leaves me with 0.007" diametrical chamber neck clearance. While that's a bit more clearance than I consider ideal, I can live with it for the sake of simplicity in my reloading. Uniform neck tension is more important to the High Power shooter than a close-fitting chamber neck. Yes, if I were to get another .30-06 reamer, I would specify a 0.337" neck instead of 0.340".
Brass Preparation
Before we go any further, size your brass with a full-length non-bushing die and trim to uniform length. Both these tasks are VERY important. If the brass is new, run it over the expander and trim to uniform length. While I don't like non-bushing dies for regular case sizing, this is where they are important. For neck-turning, you have to size the neck all the way to the shoulder junction and a bushing die always leaves about 0.050" unsized (by design, you can't fix that). If all you have are bushing dies, I recommend the Hornady New Dimension as your non-bushing die, they are well made and leave the brass very concentric.
The Expander
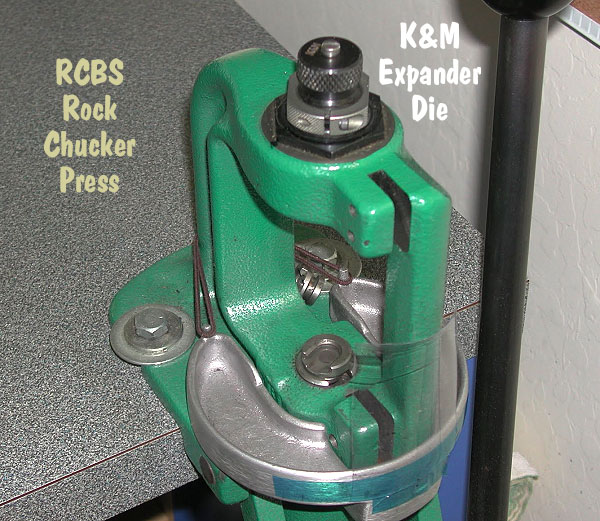
The expander is closely matched in diameter to the cutter arbor, so you must use the same manufacturer's expander and turner if you expect to get good results. Let's set up the expander in the press; there's not much to it, it screws in like a die. The K&M expander comes with a long screw which you adjust to bottom out in the case just before the neck hits the expander body. Just measure the depth of a case with the back shaft of your calipers and set the screw about 0.050" longer than that. If you somehow bend the screw and are too embarrassed to call K&M for a replacement, I have it on good authority that you can get by just fine without it as long as you aren't too ham-handed on the press when you expand.
Lube, Lube, Lube
Put some lube on the inside of the case neck and run it into the expander, really, this isn't hard. I prefer to expand each case immediately before turning it as opposed to expanding all the cases and then turning them. Brass is somewhat springy and will tend to go back toward its original size; therefore, by expanding and turning immediately, you are more likely to have all cases fit the mandrel with the same degree of tightness and to get a more consistent depth of cut.

Expand the case, dab a bit more lube inside the neck, then slide the case onto the caseholder and tighten with a wrench. Hand tightening will not do, the case will inevitably slip if you try.
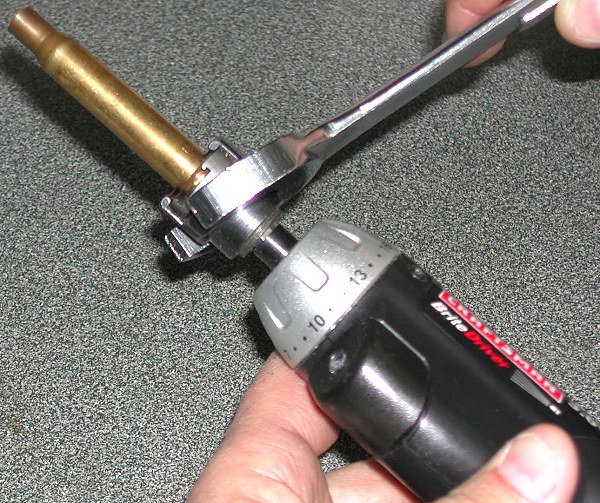
Lube the mandrel on the neck-turning tool. You're getting the hang of this lube thing now, aren't you? K&M offers regular steel and carbide mandrels; I really prefer the carbide ones as they have much less tendency to grab the case and thus make the turning process much smoother. The carbide mandrels have cutting teeth on the end to get rid of any incipient donuts at the base of the neck, they can also do some damage to the inside of the neck also if you aren't careful -- so be careful and guide the case in carefully. Be particularly careful when using power, particularly with the wobbly powered screwdrivers.

Cutter Adjustment
I've glossed over, okay totally skipped over, adjusting the tool for the proper cutting depth. While I use the K&M, I realize that there are many other makes of neck turning tools out there and there's no sense in describing the adjustment procedure for one tool and not all or many of them. Since I can't do that, it's more logical to do none. More importantly, all the tools I've seen have pretty good adjustment instructions. The only thing they don't tell you is that you should have five to ten spare cases to get it right initially. Anything of the right diameter will do while you learn, for instance, just use that cheap surplus .308 brass to do initial setup and save the precious .30-06 for when you know what you're doing. Be patient and make your adjustments slowly; you'll need to set the cutter for thickness as well as length of cut (just into the shoulder). The depth of cut (brass thickness) takes a bit of fiddling, the length of the cut is generally easy to set. It's best to keep the children away during this process, inevitably some things will be said that the little ones shouldn't hear. Later we will come to acknowledge that the tool designer came from a well documented family, but in the heat of the moment, one does at times raise the other possibility.
If you have decided on a cut that will reduce thickness by 0.0015" or more, you should make two passes on the brass. Limit the first pass to a 0.0015" reduction and finish the operation on the second pass. Obviously you won't be resetting the cutter twice for each case, so do them all at the first setting, readjust and then do the second pass on all of them. If you have to cut that much to get the brass to clean up, you might consider better brass. If you're cutting it to fit a particular chamber or to maintain a uniform thickness across several types of brass (as I do) then that's just the breaks of the game. A second cutter might be a useful idea; that's another nice thing about the K&M, it's price is low enough that having a few isn't a tremendous burden as it might be with some of the pricier models out there.
Cutting Brass
Here's the moment of truth: start the case onto the arbor, power up the screwdriver and feed the case onto the neck-turning tool mandrel, moving towards the cutter. Screwdriver rotation should be as if you were driving a screw IN (clockwise). Advance at a slow but steady pace, 20 seconds or so to make the cut to the shoulder and about the same amount of time to back it out is just about right. Don't stop the screwdriver and whatever you do, don't reverse the rotation to back it out, you'll really hurt the blade on the cutter. Just keep it turning and feed the case on and off the cutter at a nice, even rate.
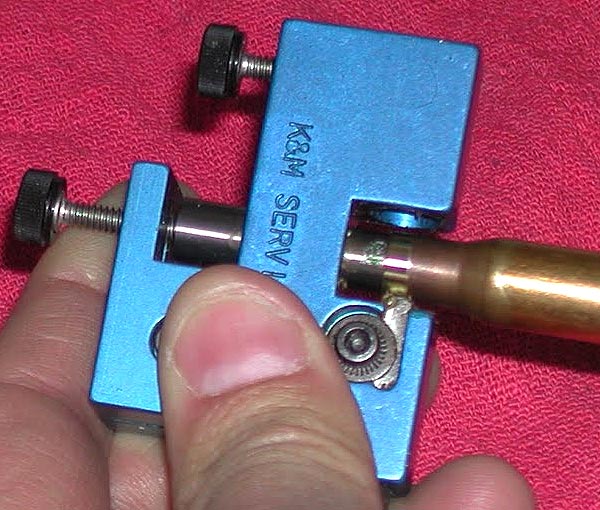
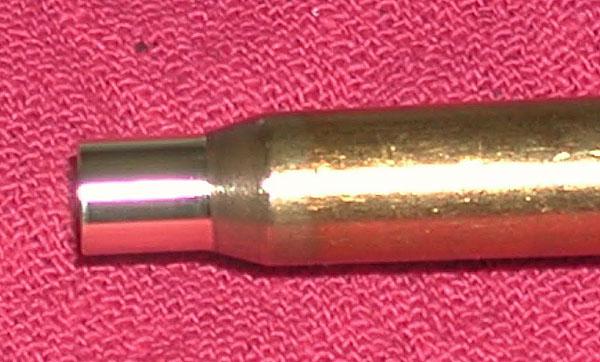
You'll remember that I said earlier that the cases all had to be trimmed to a uniform length, here's why. The K&M and most tools, use the case mouth as the stop point for the cutter -- if the cases aren't trimmed to the same length, the depth of the cut will vary accordingly. Since we want to have the cutter just bite into the shoulder, we need to have very uniform case lengths to keep from undercutting or overcutting at this critical point. Visually, you should see a small shiny ring form right at the neck/shoulder junction, just cutting into the shoulder. This is a judgment call because you really can't measure it, but keep it small. The purpose of cutting into the shoulder is to ensure that you got 100% of the neck which will prevent donuts from forming at the inside base of the neck. If there's a small, unturned ring at the base of the neck, when you fire the brass for the first time, the 55,000 psi of chamber pressure blows the neck out to the chamber wall and the neck will no longer have that bulge on the outside, it will now be on the inside and there's your donut which will make bullet seating difficult and will wreck our attempt to get uniform neck tension. On the other hand, if you cut too far into the shoulder, you can weaken the neck/shoulder junction and potentially blow the necks off the cases. I saw a nice example of this recently; I should have asked for one of the neckless cases.

Case Cleanup
Before you remove the case from the caseholder, spin it while pressing firmly onto the neck with some 000 or 0000 steel wool. There shouldn't be any grooves from the turning operation, if there are you fed it in and out too fast. The steel wool is just a little fine polishing step but shouldn't be used to fix bad turning practice, it won't do that. Remove the lube from the inside of the neck with a cotton swab, it'll interfere with measuring and you need to get it out before loading anyway.
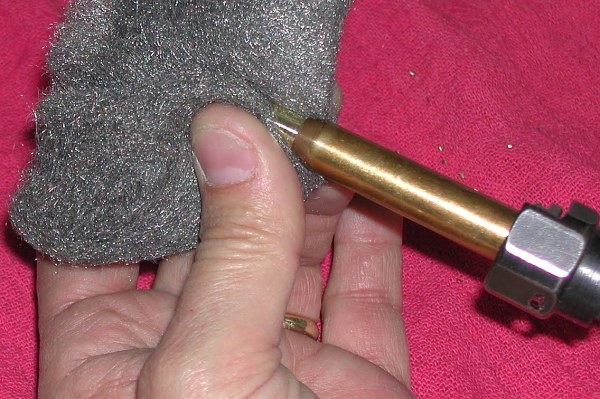
So here we are, a nice turned neck, cut just into the shoulder and looking nice. Not too hard to do. On a good session it takes me an average of two minutes per case to expand, turn, polish and measure. So I can do about thirty per hour. Normally that's my limit for an evening, so I spread the 70 cases I prepare for a match set of brass over two to three evenings. I prefer to do that than to find myself rushing through the operation because I want to get it over with. You'll be shooting the brass for a long time, there's no sense in compromising its preparation -- take your time.
Final Check
And here's the payoff, a perfect, 0.0125" thick neck. It's very uniform around the circumference, usually I only see 1 or 2 ten-thousandths variance which is perfect as far as we're concerned for this purpose. As a final bit of math (0.0125" x 2) + .308" = 0.333" so we calculate 0.007" clearance for a loaded round in our 0.340" chamber neck. Now, with the necks uniformed like this, we can select the bushing size that will give us our preferred neck tension and experiment with various levels of tension, secure in the knowledge that all of the cases will actually have the desired neck tension and thus give a meaningful result to our experimentation.
TOPICS: German Salazar, Lapua, High Power, Highpower, Brass, Cartridge, Necks, Neck Turning, Neck-Turning, Accuracy, Accurizing, K&M, K M tools, Sinclair, Mitutoyo, Imperial Die Wax, Neck Lube, NT-4000, Carbide Mandrel, Expandiron, Expander, Case Prep, Neck Tension, Norma, Winchester, Remington, feeler gauge.
All content Copyright 2010 German Salazar and/or AccurateShooter.com | 6mmBR.com, All Rights Reserved.
No reproduction or use of any kind allowed without advance permission in writing.


|